Using a script for the animation some volunteers recorded the narration and voices. A shotgun fire was located for the race start, and also some general sounds of gravel been walked over.
These sounds were attached to the appropriate parts of the story within adobe premiere pro and the complete animation then exported into a video file. On playback of the whole animation I noticed that the sounds overpowered the visual, as such I opened up the sound files into adobe soundbooth and adjusted the amplitude for them. The edited files were then imported back into adobe premiere pro and used to replace the sound files there.
Thursday, 28 April 2011

Scenes
Using the storyboard as a guideline I devised several scenes by which to tell the story. The story basically starts with the hare boasting how fast he was to the tortoise, leading the tortoise to challenge him to a race. It then goes on to see the race start with the hare speeding off into the distance and the tortoise moving very slowly. The hare, seeing how far ahead he is moves off the path to have a rest, but then falls asleep. The tortoise carries on slowly and gets close to the finishing line. The hare then wakes up and looks up with surprise to see the tortoise near the end. Quickly the hare speeds off back down the path and is just about to pass the tortoise and go through the finishing line when he strikes a small rock on the ground and his front wheel falls off. This leaves the tortoise to walk slowly on through the finishing line and win the race.
Monday, 16 August 2010
Video post?
In one scene I had three camera changes. Instead of rendering this as three seperate scenes I opted to use the video post to set up when each camera should take over.

This process seeemed easy enough until I chose to execute the sequence to render the scene. The scene apparently rendered, but I do not know to where it would have been saved as there were no options as to which directory to save the file. As such I ended up rendering each camera view individually then importing them into adobe premiere pro where they were cut and spliced together in the proper order
Rendering problems
When attempting to render static frames from some of the scenes the computers within the lab kept becoming non-responsive. To try and overcome this problem I used backburner to assign the job to several computers at once. However the problem encountered here was that the networked home drive kept going offline.
To use backburner one machine was set up as a manager and then others were connected as servers (including the manager machine itself) The jobs allocated and each server's progress was then viewed on the manager machine using the backburner monitor. This meant having to import 200-300 individual jpeg frames into adobe premiere pro and editing them to work as a whole by placing them on the timeline, selecting all, decreasing speed/duration to lowest amount possible and using ripple edit feature to apply this to all frames.
Other scenes were rendered as .avi files in stages to speed up the rendering time e.g 1 computer was set to render frames 0-50, another was set to render 51-100, yet another to do 101-50 and so on.
To use backburner one machine was set up as a manager and then others were connected as servers (including the manager machine itself) The jobs allocated and each server's progress was then viewed on the manager machine using the backburner monitor. This meant having to import 200-300 individual jpeg frames into adobe premiere pro and editing them to work as a whole by placing them on the timeline, selecting all, decreasing speed/duration to lowest amount possible and using ripple edit feature to apply this to all frames.
Other scenes were rendered as .avi files in stages to speed up the rendering time e.g 1 computer was set to render frames 0-50, another was set to render 51-100, yet another to do 101-50 and so on.
The tortoise moves
I used the bones system on the tortoise to make it move. This proved harder than it looked and actually took several tries before I got it to be anywhere near passable. Inverse kinetics were also set up to enable controlled movement of the bones, but even so found this to be a rather fiddly process despite editing the envelopes around each bone. I think the bones system is one of those things that takes time getting use to, maybe with lots of practise I will become proficient at it.

Wheel rotation on hare
Use of the path constraint to make the hare move meant that the wheels were static. To make them rotate each wheel had a float expression attached. Each wheel was selected and in the motion panel the 'x' rotation was selected >assign controller >float expression.
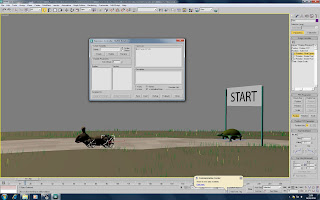
To ensure that the wheels stayed attached to the main body of the hare I used the schematic view to connect all the parts together
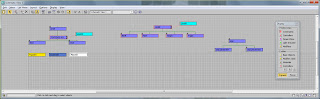

To ensure that the wheels stayed attached to the main body of the hare I used the schematic view to connect all the parts together

1, 2, 3 go!
At the start of the race I used the path constraint on the hare to enable it to move off the starting line faster than the tortoise.

Opening scene
For the opening scene of the hare and tortoise talking I used the morpher modifier. On the hare I chose to move the head, mouth and both ears.

For the tortoise I altered the position of the legs and head so that they would retract into (and out of) the shell. I also moved it's mouth and head movements.


For the tortoise I altered the position of the legs and head so that they would retract into (and out of) the shell. I also moved it's mouth and head movements.

Friday, 13 August 2010
Building the scene
To save time I used the elm tree from the application library. A start and finish post were made up using 2 cylinders each and a plane stretched across them with the word START and FINISH applied as a diffuse material bitmap, although this did create the problem of the not being able to see the sign from the back. However with careful placement of the camera this should not cause any difficuties.


 Reference image of which a section of the path was used for to create the path texture.


 Reference image of which a section of the path was used for to create the path texture.


Monday, 24 May 2010


that's better

I didn't think the hare looked right with just rear wheels so I removed the fore legs and replaced them with wheels as well. By using sub-object mode I then applied different diffuse material to the various parts of the hare and wheels.
 of the hare and wheels.

A speedy recovery
 I decided to make the hare into a child's pull along toy by adding wheels.The wheel was created from a cylinder with the polygons between the spokes deleted and the edges from both sides of the cylinder re-connected using the bridge tool. The central area was extruded to create the hub and wheel socket. The outer rim of the wheel (tyre) was inset to give a more rounded look.
patterned shell
 A shell pattern was opened in photoshop and photocopied to bring out the main detail. The image was then cleaned up to leave clear black lines on a white backdrop (below). This image was then used as a bump map material using the UVW map to apply it to the shell. The pattern works great from the top view, but I couldn't quite get it to line up from the side view.


Thursday, 6 May 2010
What fun this has been! I discovered the tortoise had a huge whole in his head, so I spent the best part of time trying to fix it. I then took the 3 front polygons at the base of each leg and applied the extrude tool to create toes. When that was fixed I deleted half of the shell and used symmetry modifier. The same was then done to the tortoise' body and turbosmooth modifier applied
 tortoise' body and turbosmooth modifier applied

Friday, 23 April 2010
 The symmetry on the head was removed leaving only half a shape. I then worked on the body shape using the background image as a template . This was done by creating a cube which was modelled around the shape of the hare's body. The back and end of this cube was deleted leaving half of the shape. This was then attached to the head section and use of the target weld applied to weld the two shapes together, ready to use the symmetry tool.
Problems I encountered: I originally included the hind leg in the modelling, but realised the use of the symmetry tool would not make two seperate legs. For this reason I decided to create the legs seperately. I also found that when I attached the body to the head, the polygons on the head turned inside out, but this was not so when they were attached the other way round.
Monday, 29 March 2010
Tortoise with shell
 The tortoise now has a shell which was modelled out of a sphere.
The eye was added by using inset on the polygon in the place of the eye earea and placing a sphere in that polygon. The mouth was also made by using the open chamfer function on the edges of the polygons where the mouth area should be.
Tortoise
 I started the turtle by editing a sphere into the approximate shape. I wasn't fussy with the body shape as this will by covered by the shell. Also the legs were only done on one side in order to use the symmetry tool.
Thursday, 11 March 2010
start on the hare
 I started on the head first by creating a cube converting to edit poly and manipulating the vertices to make the basic shape. Collapse tool used on excess edges to simplify shape. The ear was created from another cube and beveled inwards, this was then attached to the head. The polygon around the eye socket was then inset and beveled inwards and a sphere attached for the eye - this was created on the same side as the ear. The side of the head without the extra features was selected by polygons and deleted. The outside edge was then selected and levelled using the scale tool, followed by the symmetry modifier. The neck/body was started by creating another cube and modifying to ensure all vertices could be mapped onto the head, unwanted polygons were deleted then weld tool was used to attach vertices between head and neck area. Neck area edited into basic shape. Symmetry modifier used again to give a more balanced look to both sides when editing.
Subscribe to:
Posts (Atom)