Monday 16 August 2010

Video post?

In one scene I had three camera changes. Instead of rendering this as three seperate scenes I opted to use the video post to set up when each camera should take over.

This process seeemed easy enough until I chose to execute the sequence to render the scene. The scene apparently rendered, but I do not know to where it would have been saved as there were no options as to which directory to save the file. As such I ended up rendering each camera view individually then importing them into adobe premiere pro where they were cut and spliced together in the proper order

Rendering problems

When attempting to render static frames from some of the scenes the computers within the lab kept becoming non-responsive. To try and overcome this problem I used backburner to assign the job to several computers at once. However the problem encountered here was that the networked home drive kept going offline.
To use backburner one machine was set up as a manager and then others were connected as servers (including the manager machine itself) The jobs allocated and each server's progress was then viewed on the manager machine using the backburner monitor. This meant having to import 200-300 individual jpeg frames into adobe premiere pro and editing them to work as a whole by placing them on the timeline, selecting all, decreasing speed/duration to lowest amount possible and using ripple edit feature to apply this to all frames.

Other scenes were rendered as .avi files in stages to speed up the rendering time e.g 1 computer was set to render frames 0-50, another was set to render 51-100, yet another to do 101-50 and so on.

The tortoise moves

I used the bones system on the tortoise to make it move. This proved harder than it looked and actually took several tries before I got it to be anywhere near passable. Inverse kinetics were also set up to enable controlled movement  of the bones, but even so found this to be a rather fiddly process despite editing the envelopes around each bone. I think the bones system is one of those things that takes time getting use to, maybe with lots of practise I will become proficient at it.

Wheel rotation on hare

Use of the path constraint to make the hare move meant that the wheels were static. To make them rotate each wheel had a float expression attached. Each wheel was selected and in the motion panel the 'x' rotation was selected >assign controller >float expression.


To ensure that the wheels stayed attached to the main body of the hare I used the schematic view to connect all the parts together


1, 2, 3 go!

At the start of the race I used the path constraint on the hare to enable it to move off the starting line faster than the tortoise.

Opening scene

For the opening scene of the hare and tortoise talking I used the morpher modifier. On the hare I chose to move the head, mouth and both ears.


For the tortoise I altered the position of the legs and head so that they would retract into (and out of) the shell. I also moved it's mouth and head movements.

Friday 13 August 2010

Building the scene

To save time I used the elm tree from the application library. A start and finish post were made up using 2 cylinders each and a plane stretched across them with the word START and FINISH applied as a diffuse material bitmap, although this did create the problem of the not being able to see the sign from the back. However with careful placement of the camera this should not cause any difficuties.

Reference image of which a section of the path was used for to create the path texture.


Monday 24 May 2010

That's all folks


And they're off....

turbosmoothed hare

Various views of the hare with turbosmooth applied and diffuse materials.


that's better


I didn't think the hare looked right with just rear wheels so I removed the fore legs and replaced them with wheels as well. By using sub-object mode I then applied different diffuse material to the various parts of the hare and wheels.


A speedy recovery

I decided to make the hare into a child's pull along toy by adding wheels.The wheel was created from a cylinder with the polygons between the spokes deleted and the edges from both sides of the cylinder re-connected using the bridge tool. The central area was extruded to create the hub and wheel socket. The outer rim of the wheel (tyre) was inset to give a more rounded look.

patterned shell

A shell pattern was opened in photoshop and photocopied to bring out the main detail. The image was then cleaned up to leave clear black lines on a white backdrop (below). This image was then used as a bump map material using the UVW map to apply it to the shell. The pattern works great from the top view, but I couldn't quite get it to line up from the side view.


The texture below was used as a bump map material on the tortoise' body.


Thursday 6 May 2010

What fun this has been! I discovered the tortoise had a huge whole in his head, so I spent the best part of time trying to fix it. I then took the 3 front polygons at the base of each leg and applied the extrude tool to create toes. When that was fixed I deleted half of the shell and used symmetry modifier. The same was then done to the tortoise' body and turbosmooth modifier applied

Friday 23 April 2010

The symmetry on the head was removed leaving only half a shape. I then worked on the body shape using the background image as a template . This was done by creating a cube which was modelled around the shape of the hare's body. The back and end of this cube was deleted leaving half of the shape. This was then attached to the head section and use of the target weld applied to weld the two shapes together, ready to use the symmetry tool.
Problems I encountered: I originally included the hind leg in the modelling, but realised the use of the symmetry tool would not make two seperate legs. For this reason I decided to create the legs seperately. I also found that when I attached the body to the head, the polygons on the head turned inside out, but this was not so when they were attached the other way round.

Monday 29 March 2010

Tortoise with shell

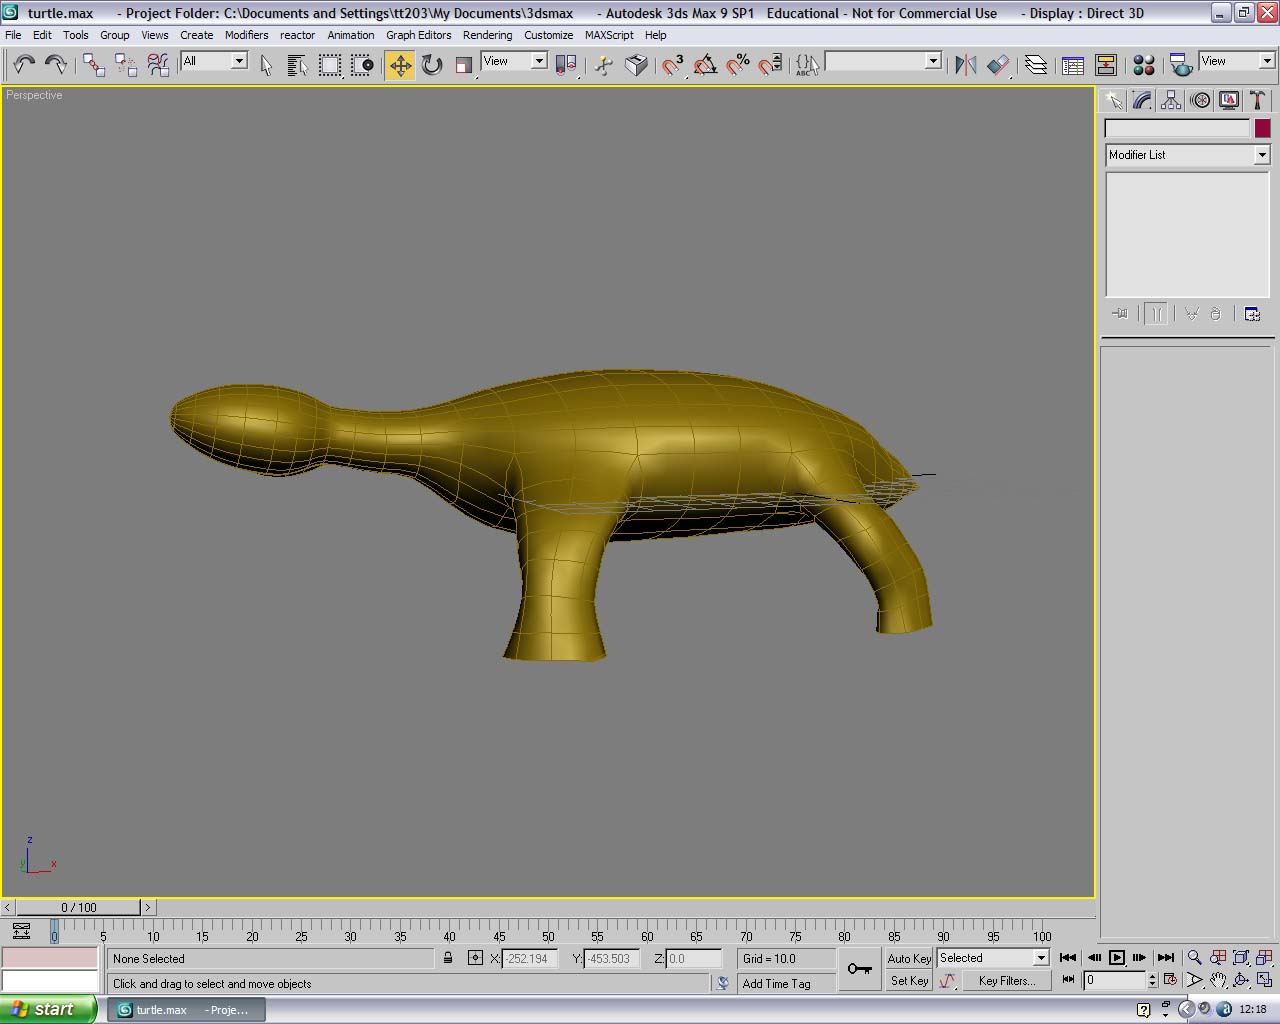
The tortoise now has a shell which was modelled out of a sphere.
The eye was added by using inset on the polygon in the place of the eye earea and placing a sphere in that polygon. The mouth was also made by using the open chamfer function on the edges of the polygons where the mouth area should be.

Tortoise

I started the turtle by editing a sphere into the approximate shape. I wasn't fussy with the body shape as this will by covered by the shell. Also the legs were only done on one side in order to use the symmetry tool.

Thursday 11 March 2010

start on the hare

I started on the head first by creating a cube converting to edit poly and manipulating the vertices to make the basic shape. Collapse tool used on excess edges to simplify shape. The ear was created from another cube and beveled inwards, this was then attached to the head. The polygon around the eye socket was then inset and beveled inwards and a sphere attached for the eye - this was created on the same side as the ear. The side of the head without the extra features was selected by polygons and deleted. The outside edge was then selected and levelled using the scale tool, followed by the symmetry modifier. The neck/body was started by creating another cube and modifying to ensure all vertices could be mapped onto the head, unwanted polygons were deleted then weld tool was used to attach vertices between head and neck area. Neck area edited into basic shape. Symmetry modifier used again to give a more balanced look to both sides when editing.

Thursday 25 February 2010

Storyboard for animation

I've drawn animals for this storyboard but I am hoping to model them with human characteristics.

Hare and the Tortoise moodboard

I would like my final animation to have a light-hearted feel about it, so I choose to make this moodboard with a comic touch about it.

Final decision

I have decided to go for the well known story of 'The Hare and the Tortoise.' As I feel this can translate into an animation befitting for all ages. In fact it has already been developed into an animation several times in the past. Perhaps one of the more well known of these is the Loony Tunes Bugs Bunny and Cecil Turtle's 'Tortoise Beats Hare.'

Wednesday 17 February 2010

Second thoughts...

I'm thinking that the three I have chosen are not appropriate animations for children. Research into animations for children shows that those for younger children of preschool age tend to be simplistic shapes and textures with bright colours. The storyline tends to be educatory and about friendship and set in an imaginary world. Songs and movements are repeated, yet short. Humour revolves around the slapstick kind. Overall the animation only lasts for about 10minutes. As children progress through primary school they begin to develop a sense of adventure and storylines need to reflect this, however their attention span is still shorter than that of an adult. Also children up to the age of about 10 will take things literally and develop a real fear of failure. Children around this age are developing a sense of humour and are more able to understand jokes and riddles. Animations aimed towards primary school aged children often follow a storyline with a moral or scientific background. The images are becoming more complex, yet still remain simplified. By the time children approach and enter into secondary school they are becoming more engaged with the outside world. They are now challenging and questioning things going on around them. Animations for this age group need to have a gripping storyline with cliffhangers to keep the children engaged. Animations aimed towards the secondary school age child also seem to be segregated into one's for the boys and one's for the girls. When we look at animations for older children and adults the images seem to be fairly basic, however there are lots of smaller details which can add to the experience for the older audience without spoiling it for the younger children. The storyline also runs along a dual course in that it can be easily understood by the youger audience, yet still contains enough plot twists and humour to keep the older audience intrigued.

Given this information I am going to rethink which fable to choose and hopefully this time choose one which is more appropriate. I think I will concentrate on the primary school age child, although there is a big developmental gap between those aged 5 to 11, I hope the images and storyline will be able told in such a way that all ages will benefit.

Moodboard for The man and his two wives

I had fun in photoshop for this one making the man bald.

Moodboard for woodcutter and the serpent

    I just concentrated on images of the woodcutter, his home and the serpent for this one as I felt the story was fairly simplistic.


Thursday 11 February 2010

Moodboard for Belly and members

With this moodboard I aimed for the internal working of the digestive tract, through to the clockwork effect of eating and ended with what happens if you don't eat properly.

Thursday 4 February 2010

anyone for tea?

A simple animation in camera view using set key function to position teapot along timeline, which was reduced to 50.

Thursday 28 January 2010

The belly and the members

The members of the body rebelled against the belly one day, saying "why should we pander to your needs when you just sit there in luxury." So they decided to stop their work, however the whole body soon became lethargic and debilidated, too late they repented of their folly.
"All must work together for a common goal"

I think an animation of this one would end up being more along the lines of "this is what happens if you don't eat properly" than the intended message.

The woodman and the serpent

One winter's day on his way home from work a woodman spied a seemingly dead serpent on the ground. Nonetheless he picked up the serpent and cradled it to try and warm it. On reaching home he placed the serpent down in front of the warm hearth. Slowly under the watchful eyes of his children the serpent slowly came to life again. One of the children bent down to stroke it but the serpent reared up and drew it's fangs ready to strike the child, so the woodman drew his axe and cut the serpent in two saying
"No gratitude from the wicked"

This seems the most promising one to anmate so far, but I'm concerned with the changing background and how this is achieved in 3DS max.

The man and his two wives

A man had two wives. The older one liked him to look older so she pulled out his dark hairs, whereas the younger one liked him to look younger so she pulled out his grey hairs..............
Consequently the man soon found himself bald.

"give in to everyone and you will lose out yourself"

I like the sound of this one, but I imagine the hair would be difficult to animate.

Aesop's Fables

I guess the previous semsester's animal modelling may actually come in useful here. However the difficulty may come in making an ancient story understandable to today's audience, considering some of the original moral meanings may be construed differently today.